Monday, July 20, 2009

Final Screen-Print


This is the finished product of my silk screen from last week. I took the screen and created a finished piece and added in some collaged pieces to top it all off. I think it turned out cute!

As for the connection with Warhol, there is no new revelation here. It is still a very mechanical process, and I did add in another media to the work as he often did in his work. We'll see what comes up as I write my reflection.

Monday, July 13, 2009

Another Screen Print


This is another attempt at screen printing. I modeled this design after my Scottish Terrier, Ruby. I tried to keep the design simple because the screen stencils are hard to cut if they get too complicated. And forget adhering them.

Warhol used to send our his designs to be pre-made by a printing company. He never cut the stencil himself. Yet another attempt by Warhol to be as "machine-like" as possible.

Tuesday, July 7, 2009

Another Stencil


This is another stencil print I did. I created it using a pre-cut stencil and then I added my personal touch (as usual). This form of printing really doesn't give me much insight into Warhol's work, its just fun.

Sunday, June 28, 2009

Warhol Style Screenprints


While I was printing my original screen prints and while the screen was wet, I decided to try printing as Warhol did. I took the same image and repeated it over the ground multiple times. I did not clean the screen, I did not try to print cleanly or precisely, nor did I worry about positioning. I just printed one after another like Warhol. Amazingly, it yielded an industrial looking piece quickly and easily.

When thinking about the process, I realized how Warhol viewed this style of art. Warhol often said, "I want to be a machine." In adopting this style of art, he achieved his goal as closely as he could. A machine can not stop to see the imperfections or reposition the screen or paper for centering. It just prints, over and over, without "looking." In doing this exact process, I gained an understanding of how this type of printmaking process was in fact just like a mechanical process.

Finished Screen Print


Here is my original finished screen print.

Tuesday, June 16, 2009

Screen Printing


I tired my first screen print yesterday. The process is quite a bit more complicated than some of the other designs, but still a very mechanical process (This is what Warhol wanted). Screen prints are done using the following steps (this is the abridged version)...
1. Draw a simple design on copy paper. Tape that design down to a drawing board.
2. Place stenciling film over the design and tape down.
3. Cut the design that shows through the film with a stencil knife using light pressure. Peel the green film from the plastic backing.
4. Adhere the film to a silk screen with adhering fluid. Let dry.
5. Peel plastic backing from the screen (this will leave the green adhered film to the screen.
6. Place paper under the screen.
7. Add ink to the screen and pull ink across the screen with a squeegee, creating the design on the paper.

Another Logo Design


Warhol was fascinated by commercial art. He created many of his signature pieces using logos from existing consumer products. I tried this concept with my own consumer product. I used a common peanut butter jar and copied the label, repeating it over the paper. I finished mt design in mixed media (watercolor, colored pencil, and marker).

In doing this design, I was forced to see this product in a different way than usual. Normally, I would just pull this jar from my cabinet and make a sandwich, but this work forced me to see this common product as an artwork. I was able to study the shapes and layout of the label in a way I never had before.

Friday, June 12, 2009

More Stencils


I worked on a few more concepts using stencils. See what you think.

Wednesday, June 10, 2009

Logo Designs


Andy Warhol's most famous pieces were his commercial work using logo designs. He tackled each logo in different ways. Some stenciled, some screen printed, and some painted by hand. These became some of his more well-know works. Among his most notable were his Campbell's soup cans. He also experimented with Brillo Pad boxes, Corn Flake boxes, and gas station logos.

I decided to attempt my own version of Warhol's logo designs. I chose a logo (the apple computer logo), and I repeated it using a stencil process. Once I finished stenciling, I began adding to it using colored pencil, and marker. Its not my best, but it was an interesting experience. I have also been workong on a few more and will post those pictures as soon as possible.

Monday, June 1, 2009

The Last of the Linoleum Prints


I tried one last linoleum print. I don't feel this batch turned out so well. I think the ink I was using was going bad because it was too thick. I printed about six of them and I was not getting any that were up to my standards. See what you think. This one was probably the best of the bunch.

Monday, May 18, 2009

More Prints


I tried another linoleum block. Here's a picture of the latest prints. I am also in the process of cutting one more.

Tuesday, May 12, 2009

Block Printing


Linoleum block is considered a forms of relief print. It involves inking a raised surface and stamping that image onto a ground. Although Warhol never used linoleum block, it still falls under the general heading of "printmaking" so I cut one. It began with a block that is about 13"x13". Of course, I have to be complicated and remove the negative space. Needless to say, this print took me some time. I printed in an Andy Warhol style and did twelve prints on 14"x14" paper. I was really pleased with the finished product.

Warhol often took the same image repeating it over and over changing things just slightly to make each print different and unique. What drew Warhol to printmaking was the industrial feel and some of the imperfections caused by the printing process. As you can see, no two are the same.

Friday, May 8, 2009

Print Comparision


After looking at these prints side by side, I realized how closely related they are to Warhol's work. For example, Warhol took an image and created a screen for printing. Over and over he printed the same image using different color combinations and placement. The result, several different prints, all resembling the original picture, but tackled in a multitude of different ways (see Marilyn paintings). My oxidation prints are much the same. I began with similar looking prints, and changed them into two totally different peices using the same materials. The outcome is two completely different pieces that began the same.

Thursday, May 7, 2009

Second Oxidation Print


I finished my second oxidation print! This one took some time as you can see.

Fine Arts Festival


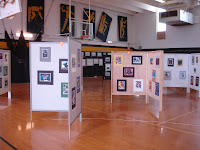
Last week I was completely consumed by coordinating the Fine Arts Festival for the School I work for. In the past our department (which is comprised of Band, Drama, Choir, and Art) have had separate shows, and performances to showcase our students. This year we decided to combine them into one festival.

I spent the week leading up to the festival sorting supplies, tagging artwork, coordinating help, and making signs. We had drama, band, and chior performances, traveling mimes, student demonstrations, artwork displays, hands on activities, and even food. It was really quite involved.

The Festival turned out to be a complete success. I learned quite a bit from this experience. First, I realized how interested the community actually is in the Arts, and how important it is to many of our students. Second, I was able to tie this experience to some of Warhol's work. Warhol wanted more than anything for people to notice and recognize his work. He thrust his work in gallery after gallery, in order to showcase his talent and get noticed. In a sense, we as teachers were showing off our students' talents to get our program noticed and promote growth in our discipline. Third, I realized that how helpful some of my students really were when given a meaningful task.

Monday, April 27, 2009

Rust Prints


Warhol did a series of paintings known as the "oxidation series." Basically, (this is quite disgusting) he painted a canvas using a flat color, and then had one of his assistants pee on the canvas. The urine changed the color of the original canvas to some really pretty tones (but it's still disgusting). I tried doing a spin off of this same technique. I created oxidation in the form of rust (which is the final picture I submitted). I took rustable metal objects, and used them to transfer rust from the object to the paper. The process is quite simple. I will list below:

1. Soak 2 pieces of heavy watercolor paper in water for 30 minutes.
2. On a formica desktop, pour water onto the surface.
3. Layer one piece of watercolor paper, and rustable metal objects on top.
4. Pour water over objects.
5. Put second piece of paper over the objects (like a sandwich).
6. Cover with plastic sheeting, then a blanket over plastic, and then heavy items such as books over the blanket.
7. Let sit for 1 week.

When the layers are peeled back, you have 2 pieces of watercolor paper with rust prints. I just finished my first today. Take a look.

Saturday, April 25, 2009

Welcome!

Hi everyone,

Welcome to my blog about all things Warhol. Check out some of my artwork.